Quick Answer: How far can a kitchen island countertop overhang before it needs brackets?
- Two-thirds rule: No more than one-third of the countertop’s total depth should overhang unsupported, so a 42-inch-deep island can safely cantilever up to 14 inches.
- 3cm stone limits: For 3cm (the Florida standard), up to 12 inches needs no support; 12-15 inches is safe for granite and quartzite (add corbels for quartz); 15-18 inches needs steel plates or L-brackets; 18+ inches makes structural support mandatory.
- Thinner stone: 2cm stone has half the rigidity (safe only to ~6 inches), and porcelain/12mm slab needs a steel support plate for any seating overhang.
- Best material: Quartzite is the most rigid and safest for aggressive seating overhangs, with dense solid-color granite the runner-up; marble flexes more and porcelain is stiff but cracks suddenly.
- Cost: Hidden steel support plates add about $400-$900 and are the cleanest modern fix; corbels run $150-$600 per pair, L-brackets $150-$350, and waterfall legs add $800-$2,000.
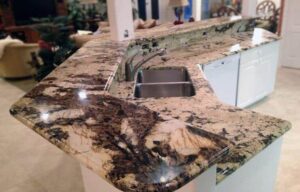
Here is a scene we see at the Orlando showroom almost every week. A homeowner shows up with a Pinterest board full of gorgeous kitchen islands. Sleek waterfall legs. No visible supports. A clean, floating countertop with three bar stools tucked underneath.
They sit down at our sample island and ask, “Can we do this? Same look, no brackets showing?”
The honest answer: sometimes yes, sometimes no, and the deciding factor is a single number — the kitchen island overhang depth. That number, combined with your stone choice and your cabinet base, determines whether gravity is on your team or fighting against you.
This article is the structural guide that most kitchen designers skip because it is more math than moodboard. Read it before you finalize your island plans, and you will avoid the single most expensive kitchen redesign mistake we see: an island that needs retrofitted steel brackets six months after install.
What “Overhang” Actually Means
Overhang is the distance your countertop extends past the front edge of the cabinet beneath it. On an island designed for seating, the overhang creates a knee-space for bar stools. On a perimeter counter, it is usually just the standard 1.5-inch lip for comfort.
Countertop overhangs come in roughly four categories:
- Standard lip: 1.5 inches — no structural concerns.
- Moderate overhang: 6–10 inches — safe for most stones without support.
- Seating overhang: 12–15 inches — borderline, material-dependent.
- Deep or dramatic overhang: 16+ inches — requires structural support.
The 12-to-15-inch range is where most island seating lives, and that is where the math matters most.
The General Rule: The Two-Thirds Principle
Countertop fabricators and structural engineers use a simple rule of thumb that works for 90% of stone installations:
No more than one-third of the countertop’s total depth should overhang unsupported.
A standard kitchen counter is 25.5 inches deep. One-third of that is about 8.5 inches. That is your safe unsupported overhang for a standard counter.
On an island, depths get bigger because you often add seating. A 42-inch-deep island can safely cantilever up to 14 inches — two-thirds (28 inches) sits on cabinet, one-third (14 inches) hangs free.
This rule is conservative. You can push it — but only with the right material and the right thickness.
Material and Thickness Guidelines
3cm (1.25″) stone — the Florida standard
Most granite, quartzite, and high-end quartz in Florida is installed in 3cm thickness. For 3cm slab:
- Up to 12 inches overhang: No support required.
- 12 to 15 inches: Safe for granite and quartzite; consider corbels for quartz.
- 15 to 18 inches: Steel support plate or L-brackets recommended.
- 18+ inches: Structural support mandatory.
2cm (3/4″) stone — budget or Europe-sized
2cm stone has half the structural rigidity of 3cm. Rule of thumb: cut all the above numbers in half.
- Up to 6 inches overhang: Safe.
- 6 to 10 inches: Support required.
- 10+ inches: Structural steel plate required.
Porcelain slab (12mm)
Porcelain slabs are thinner and much more brittle at edges. Any seating overhang requires a steel support plate regardless of length.
Why Stone Type Matters
Not all stone is equally rigid. The industry uses “modulus of rupture” — the force a slab can resist before breaking — to rank rigidity.
- Quartzite: Highest rigidity. Handles the biggest unsupported overhangs.
- Granite: Very rigid. Close to quartzite for structural purposes.
- Engineered quartz: Slightly less rigid than granite because of the resin content, which gives it a small amount of flex.
- Marble: Significantly less rigid. Softer mineral structure flexes more.
- Porcelain slab: Stiff but brittle — it does not flex, but when it does fail, it cracks suddenly with less warning.
For an aggressive seating overhang, quartzite is the safest natural pick, and dense solid-color granite is the runner-up.
Seating Planning: How Much Overhang Per Stool?
If you are designing for bar stool seating, material rigidity is only half the equation. You also need enough room for human knees, elbows, and the occasional casual lean.
Industry standard per-seat specifications:
- Width per seat: 24 inches minimum, 28–30 inches comfortable.
- Overhang depth for knee clearance: 12 inches minimum, 15 inches comfortable.
- Stool height: 24″ stool for 36″ counter; 30″ stool for 42″ bar height.
- Clear space behind stools: 36 inches minimum for walking behind; 44 inches if the kitchen is a main traffic path.
For three stools comfortably, plan 78–90 inches of counter length and 15 inches of overhang depth.
Support Options When You Push the Overhang
If you want a dramatic overhang that exceeds the safe unsupported number for your stone, you have four options:
Option 1: Wood or Stone Corbels
Triangular brackets mounted on the cabinet face that support the overhang from below. Corbels are the classic, traditional-kitchen answer.
Pros: Visible and architectural — adds craft details to a traditional or farmhouse kitchen.
Cons: Visible. In modern kitchens, corbels often read as out of place. They also interfere with stool leg placement.
Cost: $150–$600 per pair depending on material.
Option 2: Steel Support Plates
A flat steel plate (usually 3/8-inch thick) is mounted to the top of the cabinet, extending out under the overhang. The plate is hidden under the countertop and provides continuous support along the entire overhang.
Pros: Invisible. Allows for very deep overhangs (18+ inches) without any visible bracket. The cleanest modern look.
Cons: Adds roughly $400–$900 to the project. Must be planned during cabinet install — cannot be retrofitted easily.
This is the right answer for most modern Florida kitchens.
Option 3: L-Brackets
Hidden or semi-hidden L-shaped metal brackets mount to the cabinet face and extend under the overhang. Less continuous than a plate but cheaper.
Pros: Less expensive than a full plate. Works for moderate overhangs.
Cons: Brackets are typically spaced 24–30 inches apart, so you have to coordinate their position with stool placement. They can interfere with knees.
Cost: $150–$350 total.
Option 4: Waterfall Legs
Instead of supporting the overhang, the waterfall design cantilevers the entire stone past the cabinet and drops it to the floor. The stone leg becomes structural.
Pros: Dramatic, modern, no visible brackets.
Cons: Only works on one end of an island, not between seating positions. Requires an expert fabricator to miter the corner correctly.
Cost: Adds $800–$2,000 to the project depending on stone.
Common Overhang Mistakes in Florida Kitchens
Mistake 1: Designing the island without a structural review. Architects and interior designers sometimes sketch islands with 16-inch overhangs on 2cm quartz without thinking about the physics. Your fabricator should review the design before slab selection.
Mistake 2: Not accounting for stool leg depth. Stools with wide flared legs need more overhang than straight-leg stools. Measure the actual stool you plan to buy.
Mistake 3: Assuming you can retrofit support later. Once cabinets are installed and the island is built, adding a steel plate requires partial disassembly. Plan support during the cabinet phase.
Mistake 4: Running electrical through the overhang. Hidden outlets in waterfall islands look great but require conduit routing during construction. Coordinate with electricians early.
Mistake 5: Forgetting about children and floor weight tests. Kids sit, lean, and sometimes stand on island overhangs. A counter that passes a “pretty mom leaning on her elbows” test can still fail a “10-year-old doing gymnastics” test.
Real-World Case Studies
Case 1: Small Windermere kitchen, 3cm quartzite island, 12″ overhang.
No support needed. The quartzite is rigid enough, and 12 inches on a 40-inch-deep island falls within safe unsupported limits. Total cost premium for the overhang: $0.
Case 2: Lake Nona new build, 3cm quartz island, 16″ overhang.
Steel support plate installed. The 16-inch depth exceeded safe unsupported distance for quartz. Plate added $650 to the project, completely invisible after install. Counter has held up for 3 years.
Case 3: Winter Park renovation, 2cm granite bar top, 14″ overhang.
L-brackets required. The 2cm thickness and 14-inch depth on granite is right at the structural limit. Corbels were ruled out for aesthetic reasons, so three concealed L-brackets were installed at 28-inch spacing. Total cost: $240.
Case 4: Downtown condo, 3cm marble waterfall island, 20″ overhang.
Waterfall leg plus steel plate. The 20-inch overhang was dramatic and marble is less rigid than granite, so a waterfall leg anchored one end and a hidden plate supported the rest. Total upgrade cost: $2,100. The result: a magazine-ready island.
Planning Your Island: A Simple Checklist
Before you finalize your island design, confirm:
- Total island depth (cabinet depth plus overhang depth).
- Overhang depth you want for seating.
- Stone type and thickness.
- Number of stools and their leg style.
- Whether you want visible support (corbels) or invisible (steel plate).
- Budget headroom for structural support if the overhang exceeds safe limits.
- Electrical and pendant light coordination.
Share this list with your fabricator during the quote stage. A good fabricator will flag structural issues before they become construction problems.
Frequently Asked Questions
What is the maximum safe overhang for quartz?
For 3cm engineered quartz, roughly 12 inches unsupported. Beyond that, use a steel support plate.
Do I need corbels on a 12-inch overhang?
Usually not, if you are using 3cm granite or quartzite. For 3cm quartz or 2cm stone, corbels or hidden plates are a good safety margin.
What happens if I skip the support?
At first, nothing. The stone will sit fine. Over time — sometimes months, sometimes years — an unsupported overhang can develop a hairline crack along the cabinet edge, especially if people lean heavily on it or sit on it.
Can I add support after the countertop is installed?
Corbels yes, relatively easily. Steel support plate no — it requires removing the countertop. Waterfall leg requires a full redesign.
How high should a bar-height overhang be?
42 inches from the finished floor is the Florida standard for bar height. 36 inches is counter height. Pick based on stool availability and your household’s preference.
Do I need to worry about overhang on my perimeter counters?
Usually no. Standard perimeter overhang is 1.5 inches, which is structurally trivial.
Let Us Run the Numbers Before You Build
A 20-minute conversation with a fabricator before your island design is finalized will save you thousands compared to retrofitting support after the fact. At EdStone we review island plans as part of the free quote process — bring your layout, your stone preference, and your stool dimensions, and we will confirm whether your design works structurally or needs an adjustment. No charge, no pressure, and it prevents the single most expensive countertop mistake Orlando homeowners make.
EdStone fabricates and installs granite, quartz & marble countertops across Central Florida, including Sanford, Mount Dora, Altamonte Springs and Deltona. See how we fabricate, get a free in-home estimate, or call (407) 973-2074.