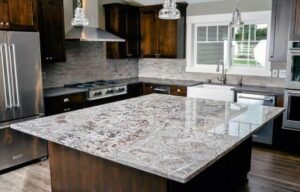
In the world of kitchen design, few features command attention quite like a waterfall edge island. It is the architectural equivalent of a well-tailored suit—sharp, seamless, and undeniably luxurious. Unlike a standard countertop that ends abruptly at the edge of the cabinet, a waterfall edge flows vertically down the side of the island, creating a continuous surface that extends all the way to the floor.
While this trend has dominated Pinterest boards and architectural digests for the last five years, it is not merely a stylistic choice; it is a complex fabrication challenge. A waterfall island requires precise engineering, specific support structures, and a budget that accommodates significant labor costs.
If you are considering this focal point for your kitchen, you need to look past the pretty pictures and understand the mechanics. Here is everything you need to know about costs, seams, support, and the critical mistakes to avoid.
Why the Waterfall Edge is Trending
The waterfall edge (also known as a “riser” or “end panel”) initially gained popularity in ultra-modern, European-style kitchens. However, it has since transitioned into transitional and even farmhouse aesthetics, depending on the material used.
Why are homeowners obsessed?
- Visual Continuity: It turns a kitchen island into a piece of sculpture. By extending the stone to the floor, you showcase the material’s natural beauty—especially if you are using a stone with dramatic veining like Calacatta marble or quartzite.
- Clean Lines: It conceals the side of the cabinetry. Standard cabinet sides are often just painted plywood or veneer, which can look unfinished or get scuffed by foot traffic. A stone leg protects the cabinetry and creates a monolithic look.
- The “Anchor” Effect: In open-concept homes, a waterfall island acts as a visual anchor, clearly defining the kitchen zone without closing it off with walls.
The Construction: Mitered Edges vs. True Thick Slabs
One of the biggest misconceptions about waterfall islands is how they are built. When you see a chunky, 3-inch thick slab of marble flowing down the side of an island, you are almost never looking at a solid 3-inch thick piece of stone. You are looking at a mitered edge.
1. The Mitered Edge (The Standard)
To create the illusion of a thick, solid block of stone, fabricators use standard 2cm (3/4″) or 3cm (1 1/4″) slabs. They cut the edge of the horizontal countertop and the top of the vertical leg at a precise 45-degree angle.
When these two 45-degree cuts are joined with color-matched epoxy, they form a perfect 90-degree corner. This technique allows you to:
- Control the Thickness: You can make the edge look 2 inches, 3 inches, or even 4 inches thick by adding a “drop apron,” even though the slab itself is thin.
- Hide the Seam: Because the seam is right on the corner’s edge (the “arris”), it is far less visible than a butt joint.
Pros:
- Creates a seamless, “block of stone” aesthetic.
- Hides the transition between the top and the leg.
- Lighter weight than a solid block.
Cons:
- Chipping Risk: The sharp 90-degree corner is the most fragile part of the countertop. If hit with a heavy pot, the miter can chip. (Many fabricators now slightly round or “ease” this edge to reduce risk).
- Cost: Mitering is labor-intensive and expensive.
2. True Thick Slabs (The Rarity)
Occasionally, you might see a “true” thick slab, but this is incredibly rare for interior kitchens due to weight and cost. Moving a solid 3-inch slab of granite is a logistical nightmare. Almost every “thick” island you see in magazines is a mitered fabrication.
3. The Butt Joint (The Budget Option)
This is when the top piece simply sits on top of the vertical side piece (or the side piece is shoved up against the bottom of the top piece).
- Verdict: Avoid this if you want a luxury look. It creates a visible seam on the top surface or the side, breaking the visual flow of the veins. It looks like two pieces of stone glued together rather than one continuous block.
Seam Placement and Vein Matching
The success or failure of a waterfall island comes down to one thing: The Vein Match.
If you are using a solid color quartz (like pure white), matching doesn’t matter. But if you are using natural stone or a veined quartz, the veins must flow from the horizontal surface over the edge and down the vertical leg without breaking.
The “Flow” Requirement
Imagine a river flowing over a cliff. The water doesn’t shift 6 inches to the left as it falls; it continues in a straight line. Your stone veins must do the same.
- CNC Precision: This requires digital templating. Fabricators use a system (like Slabsmith) to photograph your slabs and digitally overlay the templates. They ensure that a vein ending on the countertop picks up exactly where it left off on the vertical leg.
- Material Usage: To achieve this continuous flow, the fabricator usually has to cut the leg from the same slab immediately next to the countertop piece. This often results in higher waste (and higher material cost) because you can’t just use “leftover” pieces for the legs.
The “Bookmatch”
For an even more dramatic look, you can “bookmatch” the waterfall. This involves buying two sequential slabs that were cut from the mountain next to each other (like opening a book). The veins mirror each other. This is often done where two waterfall legs meet the top, creating a symmetrical Rorschach test effect.

Support Requirements: It’s Not Just Glue
Stone is heavy. A 3cm granite slab can weigh 18-20 lbs per square foot. You cannot simply glue a heavy piece of stone to the side of a cabinet and hope for the best.
1. The Vertical Leg Support
The vertical stone leg should not bear the weight of the horizontal countertop alone. The countertop needs to be supported by the cabinetry. The vertical leg is technically “cladding.”
- Mistake to Avoid: Depending on the vertical stone leg to hold up the end of the island. If the floor settles or the cabinet shifts, that joint will pop. The cabinet box itself needs to be structurally sound.
2. Overhang Support (Seating Areas)
If your waterfall island includes a seating area (an overhang), the physics get tricky.
- The 1/3 Rule: Generally, you can overhang stone about 1/3 of its total depth without support, but practically, most fabricators follow these limits for unsupported spans:
- 2cm Quartz/Stone: Max 8-10 inches.
- 3cm Quartz/Stone: Max 10-12 inches.
- Hidden Steel: If you want a standard 15-inch seating overhang, you must use support. For waterfall islands, “hidden steel brackets” (flat bars) are routed into the top of the plywood sub-top or the cabinet frame. They become invisible once the stone is placed on top.
- No Corbels: The whole point of a waterfall is sleekness. Do not ruin it with bulky wooden corbels. Use integrated steel supports.
3. Cabinet Reinforcement
Because you are attaching heavy stone to the side of a cabinet, that cabinet panel needs to be reinforced. You cannot attach 150 lbs of stone to a 1/4″ particleboard cabinet skin.
- Requirement: The side of the cabinet receiving the waterfall leg should be reinforced with a 3/4″ plywood panel or solid wood bracing to provide a surface for the adhesive and to handle the shear weight.
Budget Ranges and What Drives Price
Waterfall islands are a premium upgrade. You are paying for extra material (waste) and highly skilled labor.
The Cost Breakdown (2025 Estimates)
- Standard Countertop: $60 – $120 per sq. ft. (installed).
- Waterfall Upgrade: Add $1,000 – $2,500 extra for the fabrication labor alone.
Why is it so expensive?
- Fabrication Time: A standard eased edge can be run through an automated polishing machine. A mitered waterfall edge must be cut precisely, glued, clamped, and then hand-polished to blend the seam. This takes hours of manual labor.
- Material Waste: As mentioned in the vein-matching section, you often have to buy an extra slab to ensure the veins line up perfectly. You might buy 3 slabs for a kitchen that technically only needs 2, just to get the waterfall match.
- Installation Risk: Installing a waterfall leg is high-risk. If the installer cracks the leg while lowering it, the entire island top might have to be scrapped because the veins will no longer match a replacement piece. Fabricators price in this risk.
Rough Math Example:
If a standard 8ft x 4ft island costs $3,500 in quartz, adding two waterfall legs (mitered) could easily push the price to $6,000 – $8,000.
Common Mistakes to Avoid
1. Ignoring the Flooring Thickness
This is the number one rookie mistake.
- The Scenario: You install the cabinets, measure for the waterfall leg, and fabricate the stone. Then you install your hardwood floors.
- The Result: Your stone leg is now too long. You cannot cut it on-site without chipping it. Or, if you install floors first, you might “lock in” your dishwasher.
- The Fix: Calculate the exact finish floor height before fabrication. Ideally, install flooring before the waterfall leg goes in. If the flooring goes in later, you must shim the leg up to the exact height of the future floor.
2. The “Trapped” Dishwasher
If your dishwasher is right next to the waterfall leg, and you tile the floor after the leg is installed, you have trapped the dishwasher. You will never be able to slide it out for service because the flooring will block it, and the stone leg blocks it from the side.
- The Fix: Install the flooring under the dishwasher area before the stone goes in, or ensure there is a removable clearance bar.
3. Forgetting Outlets
Electrical code usually requires an outlet on the island. With a standard overhang, you can mount it on the side of the cabinet. With a waterfall leg, you have a solid slab of stone covering that spot.
- The Fix:
- Pop-up outlets: Installed into the countertop surface (expensive, interrupts the stone).
- Under-overhang mounting: Tuck the outlet into the apron right under the countertop edge (stealthy).
- Leg Cutout: Ask the fabricator to cut a hole in the waterfall leg for an outlet. (Warning: This ruins the clean look and vein flow).
4. Selecting the Wrong Material
Soft marbles (like Carrara) are beautiful but prone to chipping at that sharp 90-degree mitered corner.
- The Fix: If you have a busy household with kids, consider a high-quality Quartz or a Quartzite (natural stone, harder than granite). If you choose Marble, accept that the edges will likely chip over time.
“Before You Commit” Checklist
Print this out and walk through it with your contractor and fabricator.
- [ ] Vein Direction: Have you seen a digital rendering (Slabsmith) of how the veins will transition from the top to the side?
- [ ] Flooring Sequence: Is the flooring being installed before or after the island? Has the leg height been adjusted for this?
- [ ] Outlet Plan: Where exactly will the required electrical outlets go? Have we pre-wired for a pop-up or under-mount?
- [ ] Support Structure: Is the cabinet side reinforced with plywood? Are we using steel brackets for the overhang?
- [ ] Miter vs. Butt: explicit confirmation that the edge will be mitered, not butt-jointed.
- [ ] Dishwasher Clearance: Can the dishwasher be removed for service once the stone and floor are in?
Frequently Asked Questions (FAQs)
1. Can I do a waterfall edge on just one side?
Yes. This is an asymmetrical waterfall. It is very popular in modern designs, especially if one side of the island is for prep (open cabinet end) and the other faces the living room (waterfall end). It can also save money.
2. Does a waterfall edge protect my cabinets?
Yes. In high-traffic zones (like where kids run by or where barstools swivel), the stone leg protects the wooden cabinetry from scuffs, scratches, and water damage from mopping.
3. Is a waterfall island dated?
While they peaked in trendiness around 2020, they have transitioned into a “modern classic” status. However, very thick, contrasting waterfalls (e.g., black stone on white cabinets) can look distinctively “2010s.” For a timeless look, choose natural stone or subtle veining that blends with the kitchen palette.
4. Can I add a waterfall edge to an existing island?
It is difficult. The existing countertop usually needs to be removed to cut the miter properly. You also need to match the dye lot of the old stone, which is nearly impossible. It is usually an “all or nothing” replacement project.
5. How do I clean the vertical stone?
Treat it exactly like the top. Use a pH-neutral cleaner. Because the vertical surface doesn’t collect crumbs, it stays cleaner than the top, but watch out for shoe scuffs at the bottom (which usually wipe right off).
6. What is a “Floating” Waterfall?
This is a design where the cabinets are set back (recessed) at the bottom, so the stone leg appears to stop a few inches above the floor, or the cabinet toe-kick runs under the stone leg. This prevents shoe impact on the stone and creates a lighter visual, but it requires complex internal steel support since the stone isn’t resting on the floor.