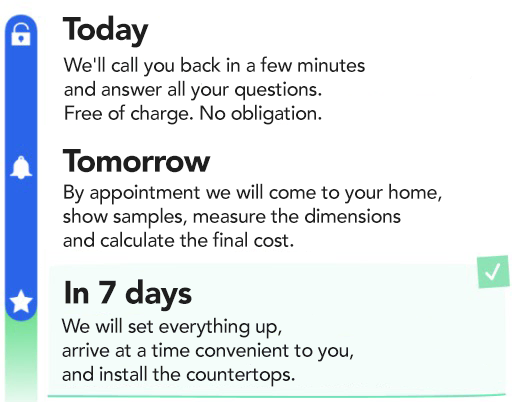
Quick Answer: What happens on countertop installation day (and how to prep)
- Timeline: From signed quote to installed stone, a typical Florida single-kitchen job takes 7 to 14 business days, broken into three phases: templating, fabrication, and installation.
- Three phases: Templating is a roughly 90-minute Day 1 visit, fabrication takes Days 2-7 at the Edgewater shop, and installation runs 4-8 hours on site (about 9 AM to 5 PM).
- Prep before templating: Have cabinets installed and level, the sink, faucet, soap dispenser and cooktop physically on site, and old countertops removed. A missing item reschedules templating and shifts the timeline by a week.
- Night before install: Empty the counters, disconnect plumbing (or schedule a plumber), clear a path for slabs weighing 150-400 lbs, and plan for no kitchen sink access for 24 hours while sealant cures.
- After install: No heavy use for 24 hours: epoxied seams take 12 hours to cure and silicone caulk takes 24. A licensed plumber reconnects the water, not EdStone.
You signed the contract three weeks ago. Your old countertops are still here, quietly staring at you every morning over coffee. When exactly are the new ones showing up, and what happens on the day?
This is the single most common question we get from Florida homeowners after a quote is signed. Most people have bought a car, a house, and even a pool, but almost no one has bought a countertop before. The process feels mysterious because nobody walks you through it in plain English.
So here is the whole thing, beginning to end. From the moment you click “approve” on your quote to the moment your contractor is rinsing a coffee mug on the new stone, this is the countertop installation process as it actually happens in a real Orlando-area home.
The Three Phases, At a Glance
Every countertop project at EdStone breaks down into three phases. Skipping or rushing any of them is how projects go sideways.
- Templating (Day 1, about 90 minutes)
- Fabrication (Days 2–7, happens at our Edgewater shop)
- Installation (Install day, 4–8 hours on site)
From signed quote to installed stone, a typical Florida single-kitchen job takes 7 to 14 business days. Bathroom vanities alone can sometimes be done in under a week. Large estate projects with multiple rooms run longer because of slab sourcing.
Phase 1: Templating Day — The Most Underrated Part of the Process
Templating is where we create a life-size digital blueprint of your countertop shapes. If a template is off by a quarter inch, every piece of stone cut from it is off by a quarter inch. So this 90-minute visit is the most important appointment of the whole project.
What happens during templating
Two technicians arrive with a laser digitizer — a tripod-mounted camera that emits infrared beams to capture exact measurements. They walk the kitchen and bathroom spaces, then:
- Mark the exact location of every wall, corner, window, and cabinet edge.
- Photograph the space for reference back at the shop.
- Discuss seam placement with you (more on this below).
- Verify sink, cooktop, and faucet placement — this is when having the actual hardware on site becomes critical.
- Confirm overhang dimensions for eating bars or waterfall ends.
What you need to have ready before templating
This is where most delays happen. A good template requires finished conditions:
- Cabinets installed and level. Templating off unlevel cabinets produces unlevel countertops.
- All sinks physically on site. An under-mount sink changes the cabinet cutout dimensions. If you “ordered it on Amazon and it’s coming Thursday,” templating has to wait for Thursday.
- Faucet and soap dispenser on site. We drill those holes in the slab, not on site.
- Cooktop on site if you have one. We need the actual appliance to verify cutout dimensions — spec sheets are not always accurate.
- No old countertops. We measure to the bare cabinet tops. Demo must be done first (we can do it for you; see Phase 3 below).
When a homeowner forgets one item on this list, templating gets rescheduled, and the whole timeline shifts by a week.
Phase 2: Fabrication — What Happens at the Shop
Once templates are captured, your actual slab goes under the CNC saw and polisher at the EdStone fabrication facility. You do not see this part, but understanding it helps you appreciate why quality fabrication costs what it costs.
Day-by-day at the shop
Day 1: Your selected slab is moved from inventory to the fabrication floor. Our team lays out the template digitally over the actual slab — this is where we decide exactly which part of the natural veining will show up on your island vs. your perimeter counters. You can request photos at this stage.
Day 2–3: CNC cutting. The slab is cut to shape using a water-cooled diamond blade. Sink and cooktop cutouts are made. All interior edges are eased so the stone will not chip during transport.
Day 4: Edge profiling. Your chosen edge (eased, bullnose, mitered, ogee, chiseled) is shaped. A mitered edge for a waterfall island takes extra hours because two slabs have to be precisely joined at a 45-degree angle.
Day 5: Polishing. The stone goes through a series of progressively finer polishing wheels until it has the final finish you selected — polished, honed, or leathered.
Day 6: Sealing (natural stones only). A penetrating sealer is applied and cured. Engineered quartz skips this step.
Day 7: Quality check and load. The pieces are inspected for chips, staining, and seam alignment, then crated for transport to your home.
Phase 3: Installation Day — A Minute-by-Minute Walkthrough
Install day is the one most homeowners stress about. It is also the easiest to prep for if you know what to expect.
The night before
- Empty the countertops. Everything on the old counters needs to be off — appliances, canisters, plants, the KitchenAid.
- Disconnect the plumbing. If you are keeping the old sink, have a plumber disconnect the drain and water lines the day before, or have them ready to arrive at install time. If you bought a new sink, we handle the drop-in.
- Clear a path. Installers will carry slabs weighing 150–400 lbs. Move furniture out of the path from front door to kitchen.
- Protect the floor. We bring floor protection, but adding a runner or moving area rugs helps.
- Plan for no water. You will not have kitchen sink access for 24 hours while sealant cures.
Install day itself
9:00 AM: Installers arrive with a crew of 2–4 depending on job size. First 20 minutes: floor and cabinet protection goes down. Drop cloths, corner bumpers, painter’s tape.
9:30 AM: Old countertop demo (if included). This is the loud part. Expect 45 minutes of noise and dust. We try to contain the dust, but have pets and kids somewhere else during this window.
10:30 AM: Cabinet top inspection and leveling. The installers check that cabinets are level across their entire run. If they are out by more than 1/8″, we shim the cabinets before proceeding.
11:00 AM: Slabs come off the truck. Depending on the piece size, slabs move in on an A-frame cart or on suction cups. The pieces are dry-fit first — placed without adhesive to confirm fit against walls and cabinets.
12:00 PM: Seam bonding. Any joints where two pieces meet get a color-matched epoxy. The installer pushes the two pieces together, clamps them, and wipes excess epoxy while it is still workable.
1:30 PM: Sink installation. For an undermount sink, the sink is attached from below with clips and heavy-duty silicone. The countertop then sits on top and is caulked where it meets the sink rim.
2:30 PM: Cooktop drop-in, faucet holes confirmed, final leveling, and caulking of all wall edges.
3:30 PM: Final clean and walkthrough. The crew wipes the entire surface, inspects every edge, and walks you through care instructions, sealer schedule, and your paperwork.
4:00 PM: They leave. Plumber comes to reconnect the sink plumbing (either same day or next morning).
What Homeowners Commonly Get Wrong
Mistake 1: Scheduling painters after countertops. Paint should be done before install. A painter reaching over a brand-new countertop is how you get a Benjamin Moore drip on Taj Mahal quartzite.
Mistake 2: Forgetting about outlet heights. If your old backsplash was tile and your new plan is slab backsplash, the outlets may need to be moved down. Talk to an electrician a week before install.
Mistake 3: Assuming the fridge stays put. If your new counters run right up to the fridge, and the old ones did not, you may need to pull the fridge for clearance. Measure before the truck arrives.
Mistake 4: Skipping the walkthrough. The final walkthrough is when you catch chips, seam issues, or alignment problems. Be in the house when the crew finishes.
Mistake 5: Using the counters overnight. Epoxied seams take 12 hours to cure. Silicone caulk takes 24. Heavy use before then can create gaps.
Mistake 6: Not labeling the breaker. If installers need to kill power to a cooktop or outlet, a clearly labeled panel saves 15 minutes of guesswork.
Homeowner Prep Checklist — Print This
Two weeks out:
- Slab selected and signed off at the yard.
- Sink, faucet, soap dispenser purchased and on site.
- Cabinets fully installed and level.
Templating day:
- All plumbing fixtures on site.
- Countertop surfaces clear.
- Final decisions made on overhangs, edge profile, and seam preferences.
Night before install:
- Countertops emptied.
- Plumbing disconnected (if DIY) or plumber scheduled.
- Path from door to kitchen cleared.
- Pets and kids relocated.
Install day:
- You (or a trusted adult) on site for templating, start, and final walkthrough.
- Breaker panel labeled.
- Have the quote PDF ready for reference.
After install:
- No heavy use for 24 hours.
- Plumber reconnects water.
- Keep the care instructions somewhere you will actually find them in six months.
Frequently Asked Questions
Will my kitchen be unusable the whole day?
Yes, roughly 9 AM to 5 PM. Plan takeout for dinner. Morning coffee is fine, just caffeinate before the crew arrives.
Can I stay in the house during installation?
Absolutely. Most of our clients work from home while we install. The noise is limited to the 30–45 minute demo window.
How much dust is there?
Demo creates some; the actual install creates almost none. We cut stone at the shop, not on site.
Who connects the plumbing after install?
A licensed plumber. Most EdStone clients either use their own plumber or we can recommend a local Orlando partner. We do not reconnect drain or water lines ourselves — plumbing is a separate trade.
What if something is wrong at the walkthrough?
Say so right then. Any chip, gap, or misalignment should be noted in writing before we leave. Warranty work is easier to claim when it is logged on install day.
Planning Your Install? Start With a Template Appointment
The templating visit is free once you have signed a quote with us. If you are in the Orlando, Tampa, or Jacksonville metros and want to scope out the timeline for your project, our team can give you a day-by-day plan within one phone call. Bring the kitchen dimensions, a photo of the current layout, and we will map out the whole sequence from today through install day.
EdStone fabricates and installs granite, quartz & marble countertops across Central Florida — including Kissimmee, Lakeland, Winter Haven and Daytona Beach. Get a free in-home estimate or call (407) 973-2074.