
Quick Answer: How to Measure Countertops for a Quote
- What you need: Just a steel tape measure (not a stretchy cloth one), grid/graph paper, a pencil, a calculator, and your phone for photos.
- The 4 steps: Sketch a bird’s-eye layout broken into rectangles, measure each run’s length and depth in inches, mark cutouts and exposed edges, then calculate square footage.
- The formula: Square feet = (Length in inches × Depth in inches) ÷ 144. Repeat for every rectangular section and add them up. Standard kitchen depth is about 25.5 inches.
- Don’t subtract cutouts: Never subtract the sink hole from your total. You still pay for that stone, and cutting/polishing the hole adds labor cost rather than saving money.
- Quote vs. final price: These rough DIY measurements are for pricing only. A professional later creates an exact laser/digital template at your home before any stone is cut, so the final price can shift.
Are you planning a kitchen remodel and need to know how much to budget for stone or quartz? Before you can get accurate pricing, you need to know how much material your project requires. Learning how to measure countertops for a quote is a straightforward DIY task that anyone can do with a tape measure and a piece of paper.
While these measurements won’t be used for the final cutting of the stone, a professional will always come out to create a digital template for that, they are essential for getting a realistic price estimate. This guide will walk you through the process, ensuring you don’t miss the details that impact the bottom line.
Before You Start: Tools and Expectations
Getting a quote is about “rough dimensions.” You want to be as accurate as possible, but you don’t need to worry about the millimeter-perfect precision required for installation just yet.
The Toolkit
Gather these simple items before you begin:
- Steel Tape Measure: Do not use a cloth sewing tape, as they can stretch.
- Grid or Graph Paper: This makes sketching straight lines much easier.
- Pencil and Eraser: You will likely need to adjust your drawing.
- Smartphone/Camera: Photos of your existing kitchen are incredibly helpful for the estimator.
- Calculator: For converting your inches into square footage.
Understanding How Quotes are Calculated
To get a solid number, you need to understand what the fabricator is looking for. The price isn’t just about the slab; it includes:
- Total Square Footage: The surface area of the stone.
- Edge Profiles: Fancy edges (like Ogee or Bullnose) often cost extra per linear foot.
- Cutouts: Holes for sinks, cooktops, and electrical outlets usually have a fabrication fee.
- Backsplash: If you want matching stone going up the wall (usually 4 inches high), this adds to the square footage.
Step-by-Step: How to Measure Countertops for a Quote
Follow these four steps to create a drawing that any stone supplier can use to give you a price.
Step 1: Sketch Your Layout
Stand back and look at your kitchen. Draw a bird’s-eye view (looking down from the ceiling) of your countertop layout. Don’t worry about scale yet; just draw the shapes. Break your counters down into simple rectangles.
Here are the most common shapes to help you sketch:
A. Straight Run (Galley)
Just a simple rectangle against a wall.
+------------------------+
|          WALL          |
+------------------------+
|                        |
+------------------------+
B. L-Shape
Two rectangles joining at a corner.
+----------+
|   WALL   |
+----------+-------------+
|          |    WALL     |
+----------+-------------+
|          |
|          |
+----------+
C. U-Shape
Three rectangles joining at two corners.
+----------+-------------+----------+
|   WALL   |    WALL     |   WALL   |
+----------+-------------+----------+
|          |             |          |
|          |             |          |
+----------+             +----------+
D. Island or Peninsula
A free-standing rectangle (remember to check all sides for overhangs).
+------------------------+
|         ISLAND         |
+------------------------+
Step 2: Measure Your Runs (Length and Depth)
Now, take your tape measure and fill in the blanks on your drawing. Measure in inches for the best accuracy.
- Measure the Length: Run your tape along the back of the countertop (against the wall) from one end to the other. Write this number down in inches (e.g., 108″).
- Measure the Depth: Measure from the wall to the front edge of the counter. Standard kitchen depth is usually 25.5 inches.
- Account for Overhangs: If you have an island or a breakfast bar where people sit, measure the total width including the overhang. Standard seating overhangs are 12 to 15 inches.
- Check Corners: If you have an L-shape or U-shape, you will have a corner. Measure from the wall to the end of the first section, then measure the next section from the corner wall out.
Tip: If your walls aren’t square, measure the depth at both ends of the countertop run. If one side is 25″ and the other is 26″, write down the larger number.
Step 3: Note the Cutouts and “Extras”
Your drawing needs to show where appliances and fixtures go. You don’t need exact coordinates for a quote, just the general location.
- Sink: Mark where the sink is. Note if it is an “Undermount” (sits under the stone) or “Drop-in” (sits on top).
- Cooktop: If you have a stove dropped into the counter (not a slide-in range), mark its location.
- Splash: If you want a 4-inch backsplash of the same stone, measure the total length of the back wall.
- Exposed Edges: Mark which edges of the countertop are visible. Edges against a wall or an appliance (like a fridge) don’t need polishing.
Step 4: Calculate Estimated Square Footage
Now, do the math to see how much material you need.
The Formula:
(Length in inches × Depth in inches) ÷ 144 = Square Feet
Example:
You have a straight run that is 100 inches long and 26 inches deep.
- 100 × 26 = 2,600 square inches.
- 2,600 ÷ 144 = 18.05 square feet.
Repeat this for every section (rectangle) of your kitchen and add them up.
Adding Waste Factor:
Stone fabrication produces waste. When stone is cut, pieces are discarded, but you still pay for the slab required to get your pieces. While you don’t need to calculate this precisely, keep in mind that the final price will account for this material efficiency.
Once you have your sketch and rough math, you are ready to Contact our team to start the estimation process.

Printable-Style Measuring Checklist
Use this checklist to ensure you haven’t missed anything before sending your info for a quote.
The Essentials
- [ ] Sketch of the kitchen layout (bird’s-eye view).
- [ ] Length of all countertop runs (in inches).
- [ ] Depth of all countertop runs (in inches).
- [ ] Island or Peninsula dimensions included.
The Details
- [ ] Seating overhangs measured and marked.
- [ ] Sink location marked (Undermount or Drop-in?).
- [ ] Cooktop/Range location marked.
- [ ] Polished edges marked with an “X” on the sketch.
- [ ] Backsplash needs noted (None, 4-inch stone, or full height).
Photos to Take
- [ ] Wide shot of the whole kitchen.
- [ ] Close-up of sink cabinet.
- [ ] Close-up of any complex corners or angles.
Common Measuring Mistakes to Avoid
Even seasoned DIYers make mistakes. Avoid these common pitfalls to keep your quote accurate.
- Subtracting the Sink Hole: Never subtract the square footage of the sink cutout from your total. The fabricator still has to buy the stone that goes there, and cutting the hole actually costs more labor, not less.
- Measuring in Feet: Stick to inches. It is much easier to calculate 89″ than 7.41 feet.
- Forgetting the Overhang: If you measure your current cabinets but forget to add the 1.5 inches for the countertop overhang, your quote will be too low.
- Assuming Walls are Straight: Walls are rarely perfectly straight. Always measure depth in a few places and assume the deepest measurement to be safe.
The Math: How to Estimate Square Footage
Once you have the length and depth of every rectangle in your kitchen, it is time to do some simple math. If you do not want to use an online countertop square footage calculator, you can easily do it yourself using this universal formula.
The Square Footage Formula:
- Length (in inches) × Depth (in inches) = Total Square Inches
- Total Square Inches ÷ 144 = Total Square Feet
Why divide by 144? Because one square foot is 12 inches by 12 inches. 12 × 12 = 144 square inches in a single square foot.
You will apply this formula to every individual rectangle you labeled (A, B, C, etc.), and then add all the resulting square footages together to get your grand total.
Worked Examples: Crunching the Numbers
To show you exactly how this works in practice, let’s look at three common kitchen scenarios.
Example 1: The Straight Run (Simple)
Let’s say you have a galley kitchen with a simple, straight line of cabinets along one wall.
- Your measurement: You measure the length of the countertop from the left wall to the right edge. It is exactly 84 inches long.
- Your depth: You measure from the back wall to the front edge of the counter. It is standard: 25.5 inches deep.
The Math:
- 84 inches (Length) × 25.5 inches (Depth) = 2,142 square inches.
- 2,142 ÷ 144 = 14.87 square feet.
For estimate purposes, you would round this up to 15 square feet for this section.
Example 2: The L-Shape Kitchen
L-shapes are where many homeowners get confused because of the corner where the two rectangles meet. The golden rule here is to make sure you don’t count the corner twice.
Let’s divide your L-shape into Section A (the long back wall) and Section B (the shorter side wall).
- Section A (The Long Wall): You measure from the far left edge all the way into the deep right corner touching the wall. The length is 120 inches. The depth is the standard 25.5 inches.
- Section B (The Short Wall): Because you already counted the deep corner in Section A’s length, you must measure Section B starting from the front edge of Section A. Do not push the tape measure all the way to the back wall, or you will double-charge yourself for that 25.5-inch corner square! You measure from the edge of Section A to the end of the short wall. The length is 60 inches. The depth is 25.5 inches.
The Math:
- Section A: 120″ × 25.5″ = 3,060 sq. inches. (3,060 ÷ 144 = 21.25 sq. ft.)
- Section B: 60″ × 25.5″ = 1,530 sq. inches. (1,530 ÷ 144 = 10.62 sq. ft.)
- Total L-Shape: 21.25 + 10.62 = 31.87 square feet (Round up to 32 sq. ft).
Example 3: The Kitchen Island (With Seating Overhang)
Islands are usually a single, large rectangle, making them easy to measure. However, you must account for seating overhangs. If you want bar stools tucked under the island, you need extra stone.
- Base Cabinet Size: Your island base cabinets measure 48 inches long by 24 inches deep.
- Standard Overhangs: You want a standard 1.5-inch overhang on the front, left, and right sides.
- Seating Overhang: You want a 12-inch overhang on the back side for bar stools.
Calculating the Final Island Size:
- Length: 48″ (base) + 1.5″ (left overhang) + 1.5″ (right overhang) = 51 inches.
- Depth: 24″ (base) + 1.5″ (front overhang) + 12″ (back seating overhang) = 37.5 inches.
The Math:
- 51 inches (Length) × 37.5 inches (Depth) = 1,912.5 square inches.
- 1,912.5 ÷ 144 = 13.28 square feet (Round up to 13.5 sq. ft).
Don’t Forget the Backsplash!
Your kitchen countertop measurements are not complete until you decide what you are doing with the walls behind the counters. Many homeowners choose to run the same quartz or granite up the wall as a backsplash.
There are generally two options:
- Standard 4-Inch Backsplash: This is a small lip of stone that runs along the back of your countertops to protect the drywall.
- Full-Height Backsplash: This runs from the top of the countertop all the way up to the bottom of your upper cabinets (usually a height of about 18 inches).
How to Measure Backsplashes:
Use the exact same formula.
- Length: Add up the total length (in inches) of all walls where you want a backsplash.
- Height: Multiply by the height you want (4 inches for standard, 18 inches for full height).
- Calculate: Divide by 144.
Example: You have 180 inches of back wall space and want an 18-inch full-height backsplash.
180″ × 18″ = 3,240 square inches.
3,240 ÷ 144 = 22.5 square feet of backsplash.
The “Waste Factor”: What It Is and Why It Matters
When you receive your official quote from EdStone Inc, you might notice that the total square footage we are quoting you for is slightly higher than the exact measurements you calculated at home.
Do not panic! We are not padding the bill. You are seeing the industry-standard “waste factor.”
In the stone fabrication industry, the waste factor is a percentage of extra material (usually between 10% and 20%) added to the net square footage of your project. But why do we have to buy more stone than ends up in your kitchen?
1. Stone Slabs Come in Fixed Sizes
Unlike wood or laminate that can be manufactured to exact lengths, natural stone and quartz are produced in massive rectangular slabs (often around 120″ x 65″ or roughly 54 square feet). We cannot simply buy “32 square feet” of granite. We have to buy the whole slab. If your kitchen requires 60 square feet of material, we must purchase two full slabs (108 square feet). While we always optimize our cuts to save you money, some leftover, unusable remnants are inevitable.
2. Vein Matching and Pattern Flow
If you choose a material with heavy, dramatic veining (like Calacatta marble or heavily patterned quartz), the waste factor increases. Why? Because when we cut your L-shaped corner or seam two pieces together, we have to make sure the veins line up beautifully so the countertop looks like one continuous piece of art. Achieving this perfect “flow” often means we have to cut out and discard sections of the slab where the pattern doesn’t match up with the adjacent piece.
3. The “Buffer” for Safety and Edges
Stone is incredibly heavy and durable, but it is also rigid. During the intricate cutting, polishing, and transportation process, there is always a slight risk of a corner chipping. Having a waste factor ensures we have enough backup material from the exact same dye-lot or quarry batch to replace a piece if necessary. Furthermore, complex custom edge profiles (like an Ogee or a Bullnose) require slightly more material depth to carve out properly.
When calculating your budget, it is always wise to take your final square footage calculation and multiply it by 1.15 (adding 15%) to give yourself a realistic expectation of the required material including the waste factor.
Final Steps: Getting Your Price
Once you have your drawing and photos, you can send them to a fabricator. They will look at your square footage and the type of stone you selected to give you a baseline price.
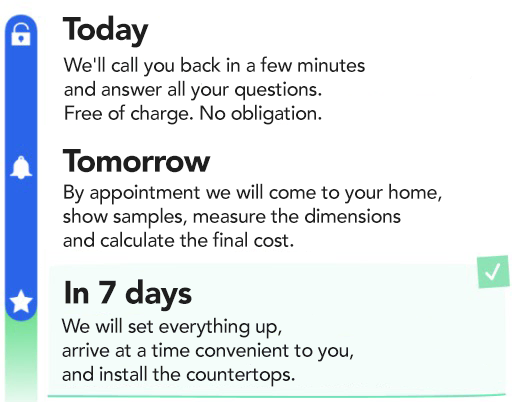
If you like the estimate, the next step is the template. By appointment we measure & calculate final cost using laser technology to ensure a perfect fit for installation.
Frequently Asked Questions (FAQ)
1. Do I need to remove my old countertops to measure for a quote?
No. You can measure right over your existing countertops. Just be sure to measure to the edge of the existing counter, not just the cabinet box, to account for the overhang.
2. How accurate do my measurements need to be?
For a quote, being within an inch or two is acceptable. However, for the final fabrication, the measurements must be exact. That is why a professional templater will visit your home before any stone is cut.
3. Should I include the backsplash in my square footage?
Yes, if you want the backsplash to match your countertop material (usually a 4-inch strip). Measure the length of the wall and multiply it by the height (4 inches) to get the area, then add that to your total.
4. What is the difference between linear feet and square feet?
Linear feet measures just the length of the run, regardless of depth. Square feet measures the total surface area (Length × Depth). Most stone is sold by the square foot, while some edging is sold by the linear foot.
5. Why is the quote different from the final price?
The quote is based on your rough sketch. The final price changes if the professional measurements reveal the area is larger, if the walls are very out-of-square requiring wider cuts, or if you choose a specific slab that is more expensive than the baseline estimate.
6. Where can I learn how to measure countertops for a quote if I have a unique shape?
If you have a curved island or an octagon-shaped breakfast nook, treat the shape as a large rectangle that encompasses the entire curve. It is safer to overestimate the material needed for odd shapes than to underestimate it.
7. Does the sink cutout save me money on material?
No. You purchase the stone for the full rectangle. The piece cut out for the sink is usually discarded or too small to be used elsewhere. Additionally, there is a labor charge for cutting and polishing the sink hole.
8. What should I do if my kitchen isn’t built yet?
If you are doing a new build or a full remodel with new cabinets, you can measure based on the cabinet layout plan provided by your cabinet maker or architect.
EdStone fabricates and installs granite, quartz & marble countertops across Central Florida, including Titusville, Cocoa Beach, Kissimmee and Lakeland. See how we fabricate, get a free in-home estimate, or call (407) 973-2074.