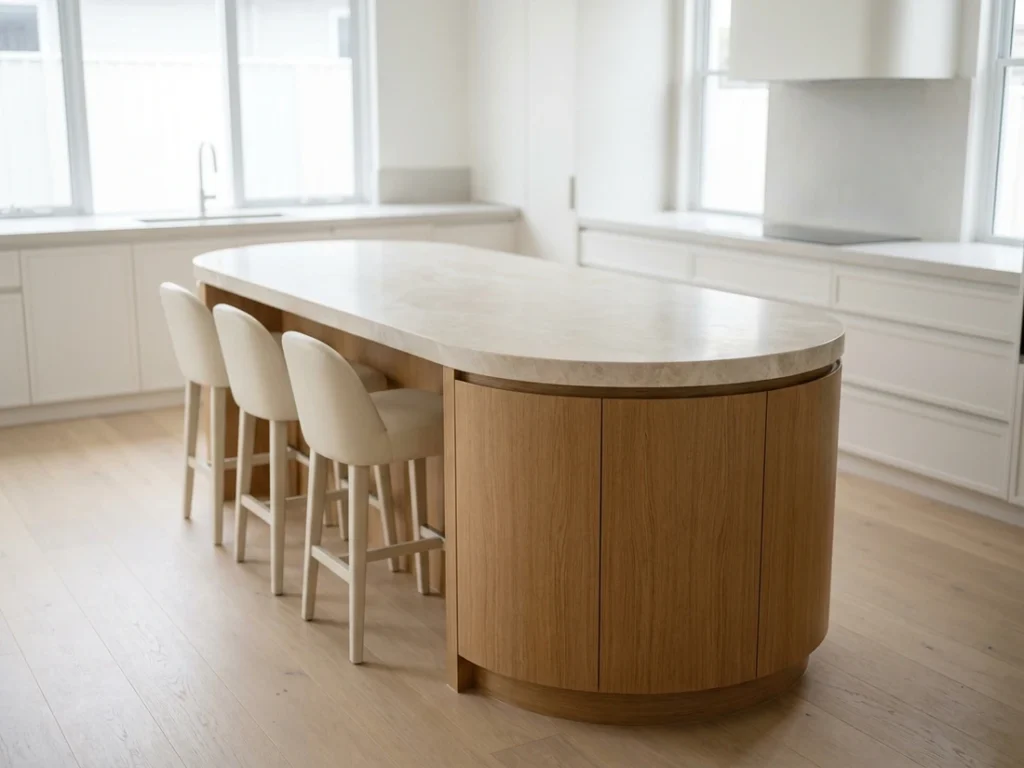
For about twenty years, every kitchen island in Central Florida was a rectangle. Sometimes a big rectangle. Occasionally a rectangle with a corner clipped off. The shape was never really a design decision, it was just what a countertop was.
That has changed fast. Over the past year, roughly one in five island projects that comes through our Orlando shop has a curve in it somewhere: a rounded end, a softly bowed front, a full pill-shaped top, a peninsula that sweeps instead of stopping. Designers are calling it organic, soft, or sculptural. Our guys on the CNC call it Tuesday now, which tells you how much the mix has shifted.
Curves are genuinely worth doing. They also cost more, and the reasons why are not obvious, which means homeowners get surprised at quoting time and sometimes get talked out of the whole idea. So here’s the fabricator’s version: what the shapes are called, how a curve is actually cut, what drives the price, which materials cooperate, and the planning details that separate a beautiful curved island from an expensive regret.
Why Curves Came Back
Part of it is simply cyclical. Hard-edged, high-contrast, all-white kitchens dominated the 2010s, and the reaction was inevitable. But the practical arguments hold up better than most trend arguments do.
A rounded island end removes the sharpest hazard in an open-plan kitchen. Anyone who has caught a hip on a square 3cm corner while carrying a laundry basket understands the appeal instantly, and it’s a real consideration in homes with small kids or older adults. Curves also improve traffic flow, because the pinch point between an island corner and a run of cabinets stops being a corner at all. In the tighter kitchen footprints common in Lake Nona and Horizon West builder homes, shaving a corner can turn an awkward 36-inch aisle into one that actually works.
And a curved island reads as furniture rather than casework. It’s the difference between a counter and a piece. When the island is the first thing you see from the great room, that matters.
Getting the Vocabulary Right
Half the confusion in curved-island conversations comes from language. Two entirely different things get called “rounded.”
| Term | What it means | Where it happens |
|---|---|---|
| Edge profile (bullnose, half-bullnose) | The shape of the countertop’s vertical edge in cross-section | A router, on any shape of top |
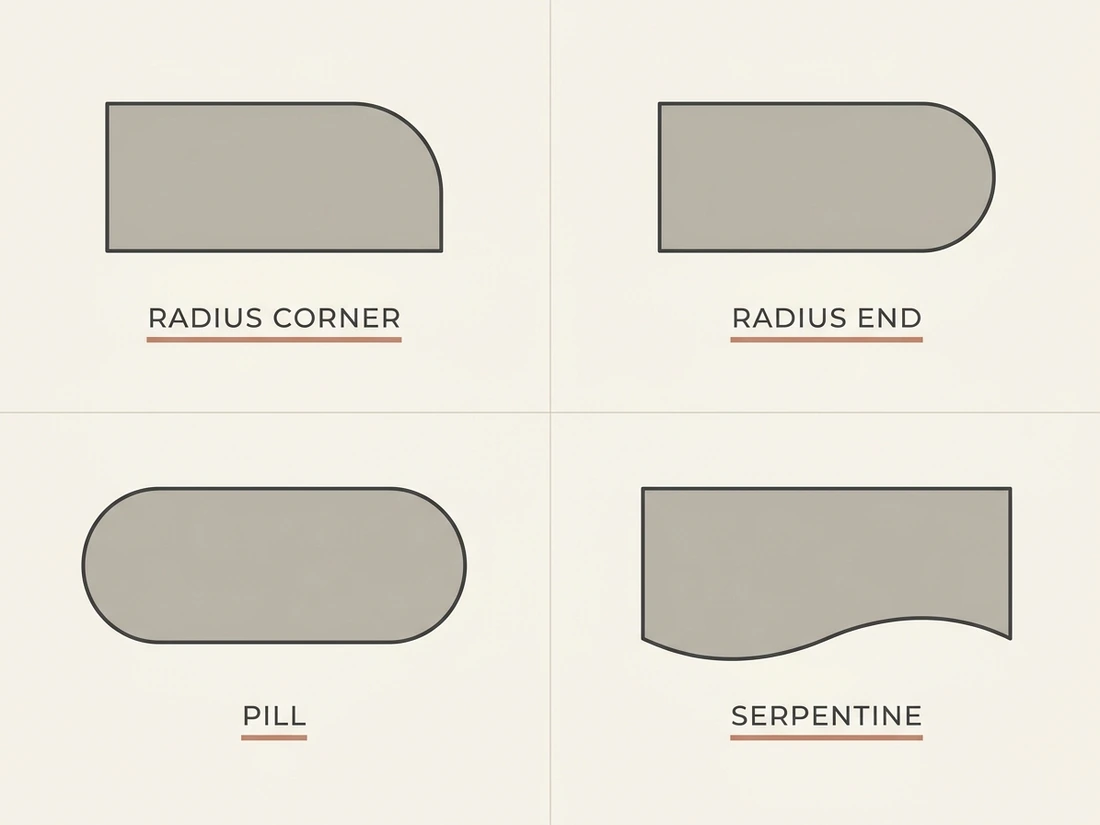
| Radius corner | One corner cut to an arc instead of a 90 | Plan view, cut on a CNC or waterjet |
| Full radius end | An entire end cut as a half-circle, radius equal to half the island width | Plan view |
| Pill or racetrack | Full radius on both ends, straight sides | Plan view |
| Kidney or bean | Asymmetric curves, usually a concave front | Plan view |
| Serpentine | An S-curve along one long edge | Plan view |
A bullnose edge on a rectangular island is a $6-per-linear-foot upgrade. A full radius end is a different category of work entirely. If your designer says “let’s soften it,” find out which one they mean before anyone quotes anything. Our edge profile guide covers the cross-section side; this article is about the plan view.
How a Curve Actually Gets Cut
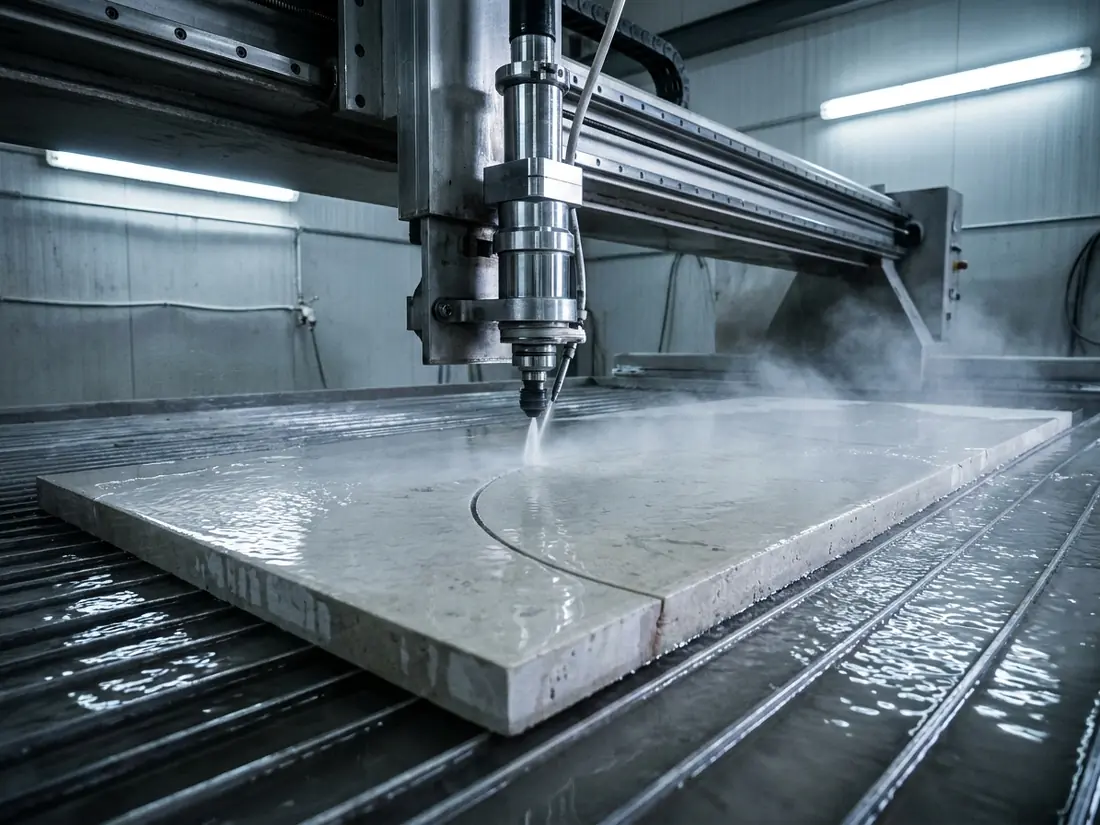
A straight countertop is cut on a bridge saw: a big circular blade on a gantry, running straight lines. It’s fast, it’s cheap, and it cannot cut an arc. Everything about curved-top pricing follows from that one fact.
Curves come off a CNC machine or a waterjet, and increasingly a sawjet that combines both. A waterjet cuts with a pencil-thin stream of water and garnet abrasive at pressures around 60,000 psi, following any path the program describes. Because nothing physically touches the stone, it can hold a tight inside radius without chipping, and it doesn’t care whether the material is quartz, granite, quartzite, or porcelain.
The workflow behind it matters as much as the machine. A curved top has to be digitally templated, typically with a laser templater that captures the actual cabinet base in your kitchen as a point cloud. That file gets drawn into a cutting program, nested onto the specific slab so the veining lands where you want it, and sent to the machine. Then the cut edge has to be shaped and polished, and here’s the part people don’t picture: on a curve, edge polishing is largely a hand operation with a profiling wheel, following an arc, matching the gloss of a factory-polished face. A skilled fabricator makes that invisible. It takes time, and time is the cost.
Inside curves are harder than outside curves
An outside radius, like a rounded island end, is a convex arc that a polisher can follow smoothly. An inside radius, like the concave sweep of a kidney front, forces the tooling into the curve and limits how tight you can go before the wheel simply won’t fit. Tight inside corners are where fabricators quote defensively, and where cheap shops chip material. If your design has a concave curve, ask what minimum radius the shop can polish cleanly.
What Drives the Price
Here’s the honest breakdown of where the money goes on a curved top. Ranges are typical for Central Florida in 2026 and vary by material and shop.
| Cost driver | Why it costs | Typical impact |
|---|---|---|
| Slab yield loss | Curved offcuts are crescents nobody can use | Often the largest single factor |
| Waterjet or CNC time | Slower than a bridge saw, per cut | $50–$200+ per curved cut |
| Programming and nesting | Drawing and laying out the shape | $75–$250 per job |
| Curved edge polishing | Hand-guided, arc by arc | 2–4× the linear-foot rate of a straight edge |
| Digital templating | Required, not optional, on curves | Usually included, sometimes a surcharge |
| Handling risk | A radiused end is fragile until it’s set | Extra crew, occasional breakage |
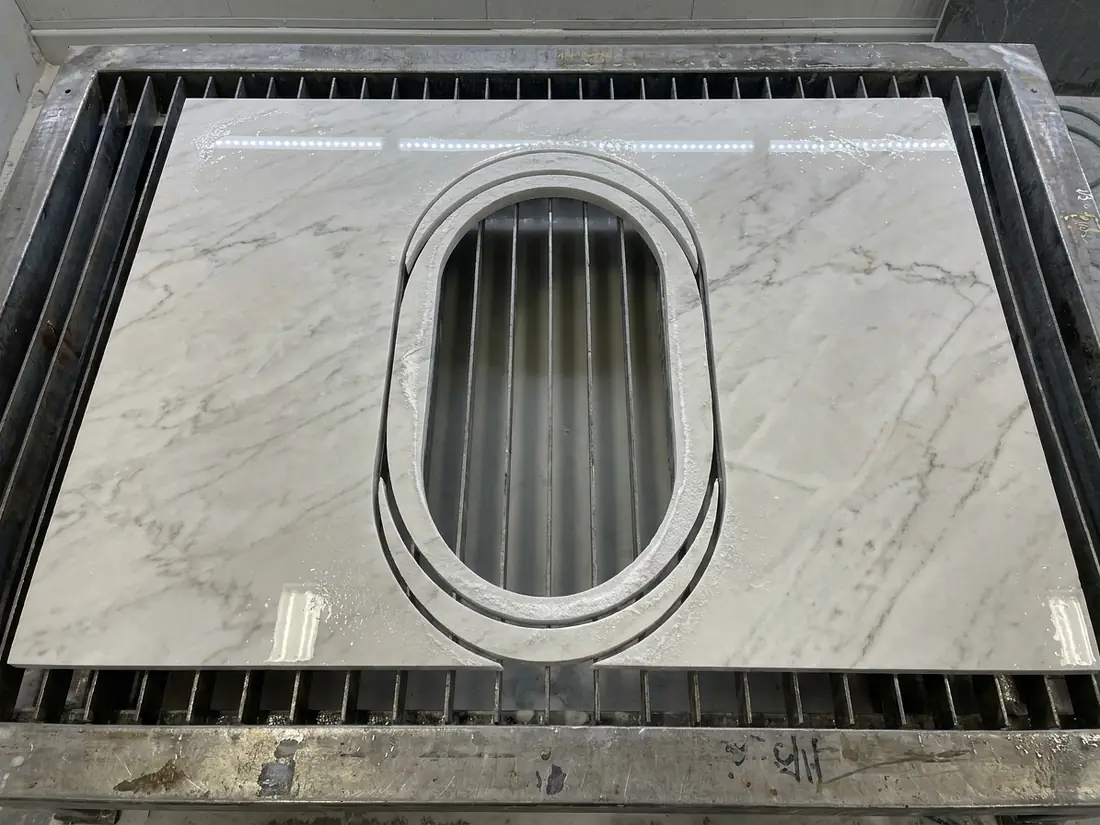
The yield issue deserves a worked example, because it’s the one that surprises people. Take a pill-shaped island, 96 inches long and 42 inches wide, both ends fully radiused at 21 inches. The finished top is about 25 square feet of stone. But it has to be cut from a rectangular blank of 96 by 42 inches, which is 28 square feet, and the four crescent offcuts are scrap. On a rectangular island, those same offcuts would have become a bathroom countertop or a run of backsplash. On a curve, they go in the dumpster.
Now scale that up. A rectangular island might share a slab with the sink run. A curved one often can’t, because the shape can’t be nested tightly beside another piece. Needing a second slab is a several-hundred-to-a-thousand-dollar swing that has nothing to do with cutting time, which is why an experienced shop will nest your job before quoting it rather than applying a flat “curve surcharge.” If you want to understand the yield math generally, our guide on measuring for a quote and waste factor covers the fundamentals.
As a rough planning number: expect a single radiused corner to add modestly to an island, one full radius end to add meaningfully, and a full pill or serpentine shape to run 30% to 60% above the same island as a rectangle. If your quote is a flat 10% over, ask whether the shop has actually nested it. If it’s triple, ask what they’re seeing that you aren’t.
Which Materials Curve Well
Engineered quartz. The easiest curved material we cut. Homogeneous, predictable, no fissures to surprise the waterjet, and it polishes to a consistent gloss on an arc. One caution: on a printed-pattern slab, a curved cut edge shows the slab body all the way around the arc, which is a long, very visible reveal.
Granite. Cuts and polishes beautifully. The consideration is pattern flow. Granite with strong directional movement looks odd when an arc slices across the grain, so nesting matters more. Bring the design to the slab, not the other way around.
Quartzite. Hard, dense, and abrasive on tooling, which shows up as a modest upcharge. Structurally excellent on curves and the arc polishes up gorgeously. Some quartzites have fissures that need attention at a radiused end where the stone is unsupported.
Porcelain and sintered stone. Waterjet only, with careful support during the cut, because a thin ceramic slab wants to crack if it flexes. Done right, the results are superb and it’s the material of choice for a curved outdoor bar top in Florida sun. Done fast and cheap, it cracks.
Marble. Beautiful, and the softest of the group. A radiused end in marble is more vulnerable to chipping over the years, and you’ll want a slightly heavier edge profile to protect it. The material comparison in our countertop spec sheet lays out the hardness and strength differences.
The Details That Ruin Curved Islands
The cabinets have to curve too. This is the number one failure, and it’s a scheduling problem more than a fabrication problem. Stone follows the base. If your island base is a rectangle and your top is a pill, the top overhangs by a foot at the ends with nothing under it. That means either curved or scribed cabinet panels, or a designed and supported overhang, decided before the cabinets are ordered. Bring your fabricator into the conversation at cabinet design, not after installation.
Overhang support on an arc. Standard countertop overhang guidance is written for straight runs. On a radiused end, the unsupported stone extends in two directions at once, and corbels or steel plates have to be placed to catch the arc rather than a line. Our breakdown of island overhang and seating support explains the underlying rules; on curves, apply them conservatively.
Seating geometry. A curved end sounds like it seats more people. Sometimes it seats fewer. Stools around an arc need radial spacing, and knees converge toward the center, so the comfortable count can drop compared to a straight run of the same length. Mock it up with painter’s tape on the floor and sit in it before you commit.
Seams on a curve. If the island exceeds a single slab, the seam placement question gets harder, because a seam crossing an arc is more visible than one crossing a straight run. A good fabricator will place it at the transition from straight to curve where the eye already expects a change. We wrote about seam strategy generally in countertop seams explained.
Where the sink and cooktop land. Curved tops lose usable rectangular real estate at the ends. Lay out the sink, the faucet, the cooktop, and the outlets on the actual curved shape before ordering, not on the rectangle you started from.
Curves That Aren’t Islands
The island gets all the attention, but some of the best uses of a radius happen elsewhere, and several of them are cheap.
The peninsula return. A peninsula that ends in a square corner sticking into a walkway is the most-collided-with surface in a lot of Florida floor plans. Rounding just that one end is a single arc on a piece you were cutting anyway, and it often costs less than a hundred dollars of extra work while fixing a daily annoyance.
The clipped corner near a doorway. Not a full radius, just a generous arc where a run of counter meets a traffic path. Almost free, and nobody ever notices it consciously, which is the point.
The curved bar or bistro top. A small radiused top on a lower or raised bar section is a place to spend on a dramatic material, because the piece is small. A crescent of quartzite or a bookmatched offcut can carry a whole room.
Rounded cabinet fronts. In a tight Florida master bath where the bathroom cabinet is directly across from a shower door, a bowed front reclaims inches of walking space and reads as custom work. Bathroom countertops are small enough that the yield penalty barely registers.
If the budget for a full pill-shaped island isn’t there this year, one of these gets you most of the feeling for a fraction of the money.
Five Rules for Planning a Curve That Doesn’t Blow the Budget
- Curve one end, not both. A single radiused end delivers most of the visual softening for a fraction of the yield loss, and it keeps one square end for efficient nesting.
- Use one radius value throughout. A design with three different arcs costs more to program, more to polish, and rarely looks better than a design with one consistent radius repeated.
- Tape it out on the floor. Full size, in the actual room, with stools. Curves read completely differently in a kitchen than on a plan, and this is a free thirty-minute test.
- Ask for the nesting drawing. Any shop with a CNC can show you how your pieces sit on the slab. It tells you whether you’re buying one slab or two, and where the veining will land.
- Don’t stack complexity. A curved, bookmatched, mitered waterfall island in a fissured quartzite is four hard problems at once. Pick the one that matters most to you. If it’s the drama of the stone, our guide to bookmatched slabs is the better place to spend the budget.
What the Job Actually Looks Like
A curved island runs on a different schedule than a rectangular one, and knowing the sequence prevents most of the surprises.
Weeks before templating: the shape gets decided with the cabinet maker. The base determines what the stone can do. This is the meeting people skip.
Templating day. The cabinets must be installed, level, and fastened. A laser templater captures the actual base, including the arc, plus wall conditions and appliance locations. Expect this to take longer than a straight job.
Slab selection and nesting. You look at the actual slab, we lay your shapes onto it digitally, and you see where the veining lands on the curve. On a curved top this step is worth attending in person, because an arc through a vein pattern is a design decision, not a technicality.
Fabrication, typically several days longer than a rectangle. Programming, waterjet cutting, edge shaping, hand polishing on the arc, and quality check.
Install day. More crew, more care. A radiused end has no corner to grab and is the most fragile point on the piece until it’s set down and supported. Seams get set, overhang supports get verified, and the arc gets a final polish check in your kitchen’s light.
Budget roughly one extra week versus a comparable rectangular job, and understand that a curved top is very difficult to rework if something is off. That’s the real argument for getting the shape decided early: on a curve, measure-twice is not a saying, it’s the entire process.
Frequently Asked Questions
How much more does a curved island countertop cost?
A single radiused corner adds relatively little. A full radius end adds meaningfully. A full pill or serpentine shape typically runs 30% to 60% above the same island cut as a rectangle in Central Florida, driven mostly by slab yield loss rather than cutting time.
Can any fabricator cut a curved countertop?
No. It requires a CNC or waterjet plus digital templating. A shop running only a bridge saw and hand tools cannot produce a clean arc. Ask directly what machine will cut your top.
Which material is best for a curved island?
Engineered quartz is the most forgiving and the most predictable. Granite and quartzite both curve beautifully with attention to pattern and fissures. Porcelain requires waterjet cutting and careful handling. Marble is the most chip-prone at a radiused end.
Do my cabinets have to be curved?
The base has to support the top. Either the cabinet run follows the curve, or the curved portion is treated as a designed overhang with proper support. This has to be decided before cabinets are ordered, not after.
Does a curved island seat more people?
Not necessarily. Stools around an arc need radial spacing and knees converge, so a curved end can seat the same number or fewer than a straight run of equal length. Tape it out and sit in it first.
Will a curve show a seam?
Only if the island exceeds a single slab. When a seam is unavoidable, it should be placed at the transition between straight and curved sections, where the eye already expects a break.
Is a curved countertop harder to keep clean?
No. It’s the same non-porous or sealed surface. If anything, the absence of a sharp 90-degree corner means one less place to bump a dish.
Can you add a curve to an existing countertop?
Almost never. Recutting an installed top means removing it, and the reduced dimensions rarely still fit the cabinets. Curves are a decision made at templating.
Bring Us the Shape You’re Picturing
Curved islands are the most fun work in our shop, and the projects that go wrong are almost always the ones where the stone shape got decided after the cabinets were already built. Get a fabricator in the conversation early and the whole thing becomes straightforward.
EdStone templates, cuts, and installs every job in-house in Orlando, with digital templating and the machinery to hold a real radius, so we can show you the nesting drawing, tell you honestly whether your design needs one slab or two, and price the curve instead of guessing at it. Bring your plan, your cabinet elevations, or a photo from a magazine, and let’s find out what your island wants to be.
Planning a countertop project in Central Florida?
- Estimate your price with our free countertop calculator
- Browse our quartz countertops
- Browse our granite countertops
- Get a free in-home estimate